
Final Project Desciption
- Arduino and Timing gate
- Delivery of Timing Data to Database
- Storing of Data and Displaying Data on the Wirelessly Connected Projector
Arduino and Laser Gate
The timing system ultimately chosen for the project includes a laser/photoresistor gate connected to an Arduino Mega. The Arduino, circuitry, and photoresistor (fastened to the end of a piece of PVC pipe) are housed on one side of the track while the laser and battery pack combo are on the other side. The circuity of the Arduino and photoresistor system can be seen below
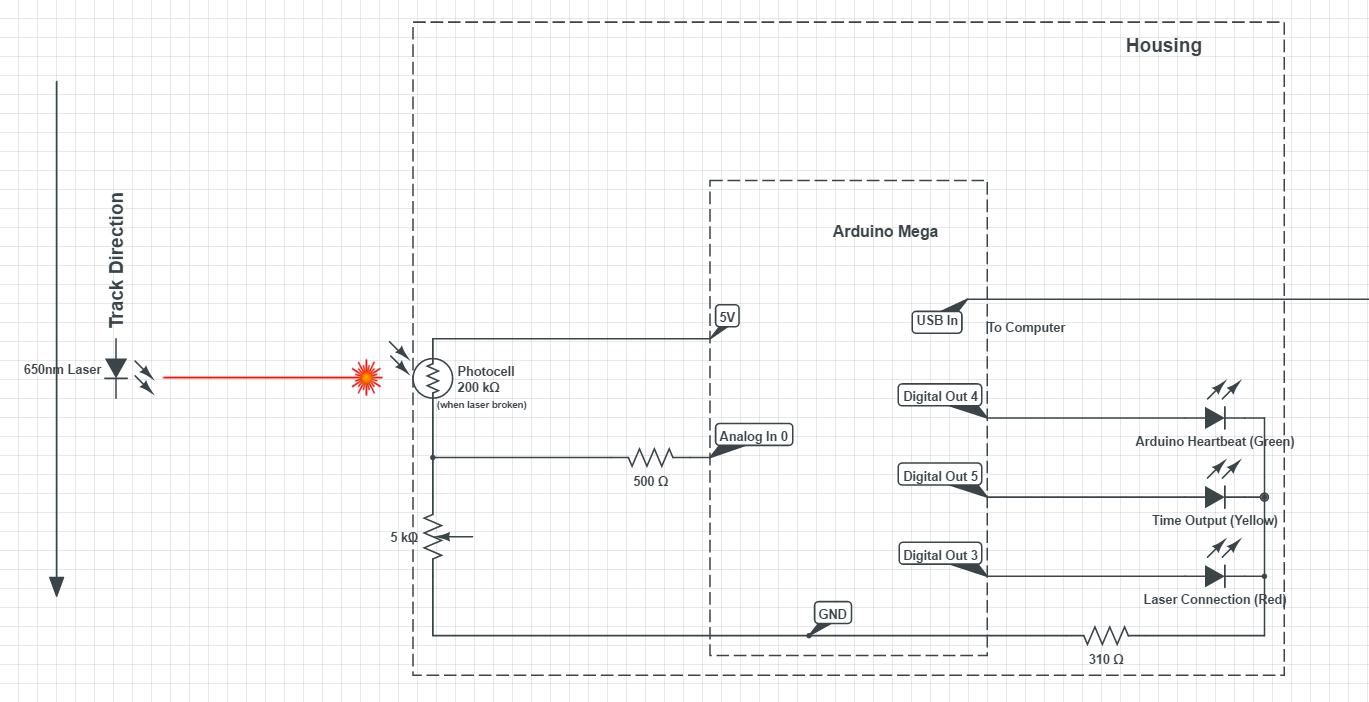
Both are fastened to a metal bar running under the track through the use of magnets. The side profile of the Arduino housing includes three LEDs (one red, one yellow, and one green). The red LED lights up when the laser is hitting the photoresistor and blinks when is searching for a laser, the green LED blinks continuously while the Arduino is running, and the yellow LED illuminates when a time is successfully outputted to the python script (mentioned below). Below is a flowchart of the code use to control the Arduino and LEDs.


SERVER & WEBSITE
In order to take in, store, and display the data the timing gate provides, a LAMP, or Linux-Apache-MySQL-PHP server is used, and it is run from the Raspberry Pi that we use to display the times over a projector. This Raspberry Pi 2 is connected to the school over the MSU-Secure wireless network, and all of the web pages used by the project are stored on it, in addition to the MySQL Server that stores all of the timing data and the student list. anyone connected to the MSU-Secure wireless network, or connected with Ethernet to the school can use a web browser and navigate to these pages. this allows people to see the top 10 times across campus if desired, or prep the database with the student names so less work would need to be done on site to prepare for the event. Security of this site may be a concern to some, so we do have the ability to rename the pages to the site with a string of text, making our Link Hub page accessible only if you have the link address e-mailed to you.
TOP TEN TIMES PAGE:
This page is the "index" page of the website, and is the first one you would see if you use a web browser to reach our website. It is used to strictly display the ten fastest times recorded and the most recently entered time. The “Top Ten Times” table is designed to only allow one time per student in order to eliminate the possibility of one student dominating the scoreboard, creating a very unexciting table. The other table, “Most Recently Entered Time" displays the last completed time recorded, regardless of making a top 10 time or not. The final information on this table is the IP address the Raspberry Pi is using to connect the schools network. This allows anyone who is connected to the MSU-Secure wifi network to access the display page by simplifying typing the IP address as a URL. This is the page that the Raspberry Pi boots to when powered on, opening up in full screen to eliminate the use of a keyboard and mouse to reach the required page to display the times.

LINK HUB PAGE:
This is a page that links all the pages together to make it easy to access each without having to type in clunky URLs. The first link goes back to the top 10 times page. the second link goes to the page used to enter in and correct all time data. the 3rd link goes to the page used to add or correct all information related to the students. The other additions to the page is a link to a download that includes all the necessary items to do the timing of the event and a README to install these. This means there isn’t a specific computer that is need to be used and any Windows computer can do the job. The final part of the page is an image of a barcode that makes the barcode scanner add a tab at the end of a scan, making the job of the person timing the event easier.

ADD STUDENT PAGE:
This page gives the functionality of adding students to the class list though the web page. It has five different fields, the first two being “First Name” and “Last Name”. These fields are used in conjunction with a button that adds them to the class list with an ID that is autogenerated. The next fields are “Student ID”, “Updated First Name”, and “Updated Last Name” with a button “Update Student” bellow. These fields are used in case there is a mistake made and the names need to be changed. There is then a link to a printer friendly class list. This takes away the unnecessary ascetics of the page to create a more printer friendly page. The final aspect of this page is the Class list itself. It is quite simple, showing the class list with their student ID, First, and Last Names, allowing easy reference should any info need to be corrected.

ADD TIME PAGE:
There are five buttons on the page to achieve various functions, along with two text entry fields to direct the buttons. The first is the “Queue Student” button, and it uses the Student ID text field to put a student into the "on track" list with a time of zero. This field will be automatically updated with a time from the Arduino upon the next time the laser gate is broken. The next button is the “End Time” button, and it uses both Student ID and Arduino Time's ID text fields. It will create a final lap time by finding the difference in time between the start time displayed in the Active Track Events list and the end time selected from the Unused Arduino Events List. The other buttons are used in case a mistake is made and needs to be undone. The “On/Off Track” button requires a student ID and will only place a student on the track, or take them off the track depending on the situation. This button will primarily be used for taking a student off the track should they have crashed, or gone off track. The next button is the “Oops!” button, which will designate a time added to the system as a mistake time and will take it out of the system to reduce confusion. The final button is used in the case of the connection between the Arduino and the database being lost. When the connection is achieved again, and the laser gate is broken, it will put all times recorded into the system in event order. This makes it necessary to designate some of these as start times and some as end times. The “Start Time” button will make it possible associate a Time ID to a Student ID as a start time.
The final part of the page includes two tables. One is the list of times that are available to be used as a start or end time. The other is a list of students that are on the track. These lists are displayed and updated by using a field that is either designated a 0 or a 1 in the MySQL Database, and it will be displayed if it is flagged as a 0. This allows us to store and not display times that have already been used. When a time is first entered and is not yet used as a start or end time, it will give a value of 0 and will be displayed on the “Arduino Times” table. When a start time is given to a student, the time will be given a value of 1 and the student will then be give a value of 0, causing their start time and name to be displayed on the “Student on Track” table. Once an end time is give to a student, they will be given a value of 1 again and will not be displayed any more. This gives the person running the event information necessary to associate times correctly. We use this setup to allow tracking of multiple cars on the track at once.

SECURITY:
Using a LAMP server is known to be very susceptible to security issues. These include things like SQL injection, stealing personal information, and just trying to break the system overall. To prevent these things from happening some security measures were put in place. First of all each field has been heavily restricted to make it only possible to enter numbers, like the “Student ID” and “Time ID” fields, or letters, ex. “First Name”. This eliminates the possibility of injection because in order to do so characters other than numbers and letters are required.
To eliminate the chance of stealing personal information we have not used any data that could be considered sensitive to the students. The student ID is unique to this system and no login information is used because this is hard to guard and would make SQL injection easier. Another way to prevent people from access parts of the site that could lead to cheating was to just not allow them to be easily accessed. The IP address will lead you to the display page and the display page only. Previous knowledge is required to access the Link Hub page, and all other parts of the website. The final measure added to keep someone from breaking the MySQL side of the LAMP server was to limit the commands available to anyone using the website. Only the minimal commands used are allowed, meaning that if someone found a way to write SQL commands into the fields, they would only be able to a very limited amount of things that would most likely not break the system.
The final goal was to keep the system from being easily broken. This mostly involved making sure the information being entered actually exists on the table and is available for assignment. This was done by putting in a check to ensure what was being entered was within the range of each table. Should someone try to associate a time that has been used before, or a time that has yet to happen, an error will display letting the user know that something is incorrect. This also happens if someone tries to enter in student ID numbers that are not in use. when someone puts in data for student names or corrections, there is a check in place to ensure that only letters are used, or a similar error will be displayed.
CONCLUSION AND FUTURE PLANS:
These systems together make up our timing system we have created for use with the Freescale Cup. Should someone have a similar event, we can use this system to time it as well. In the future, it would be possible to make the Arduino and laptop be replaces with a second raspberry pi, making the whole system total cost lower, requiring the user to provide only a monitor, keyboard, and mouse.